Good afternoon, crafty people. Welcome to the weekly What Are You Working On diary, a place for sharing information and hoorays about what smart hands and smart heads can accomplish.
A couple of years ago after I had finished knitting Niebling's Goldregen, I was contemplating with dread getting it blocked. It was a difficult piece to knit, and because of it's intricate structure, I knew it would be a challenge to get it simultaneously adequately stretched to show the stitches, yet preserve the textures created by the gathered stitches which create the flowers.
So of course, I googled, then went link-surfing where I found this bare little snatch of a description for using PVC to make a lace blocking frame.
But I figured "how hard can it be?" and I was off to the hardware store for ½" PVC. I had the Mister cut me four 6 foot lengths (thinking ahead to the size of Shetland lace shawls) and immediately came across the first problem: ½" PVC cut at that length is too flexible and floppy. And I knew I didn't want all the bulk of using 1" PVC. So I had the Mister cut the 6 foot pieces in half, and used couplers to join them together — that solved the floppiness, but it was impossible to get a nearly-round piece (Goldregen has 12 sections) evenly tensioned on a square frame. So I put the idea aside for awhile.
And then I finished knitting the Queen Susan Shawl — at 6 feet square, I knew I had to revisit the idea of the PVC frame. And, while the idea is simple in concept, it does take more than just a picture to get it to work well, and easily.
 The first thing I had to figure out (and I'm not kidding) is the best way to attach the rubber bands to the frame. I tried shorter rubber bands slipped directly onto the PVC (not good; you have to take things apart to add more rubber bands if you need them), before settling on what Office Max calls a "Size 117 Super Wide And Long" — these are 6" long (doubled) and 1/8" wide. Using the longer rubber bands meant I could attach the bands by wrapping them around the PVC with a simple lark's head hitch — you can add or take away rubber bands as you need them.
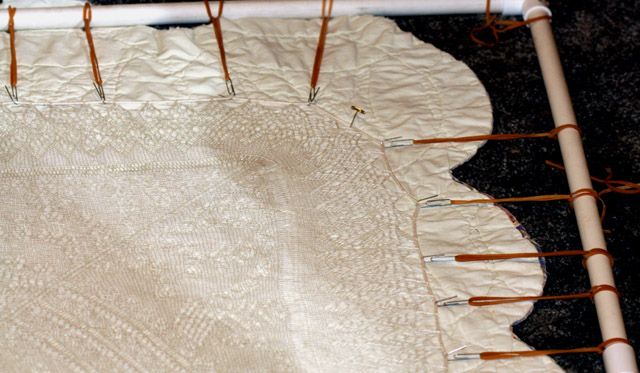
Next came the actual blocking. The first step, of course, is to thread the edges of the lace piece onto a smooth piece of strong thread or cord — it should have some give, but not be really stretchy. I prefer to let a piece of lace dry before I start to block it, as the pieces are just too fragile when wet.
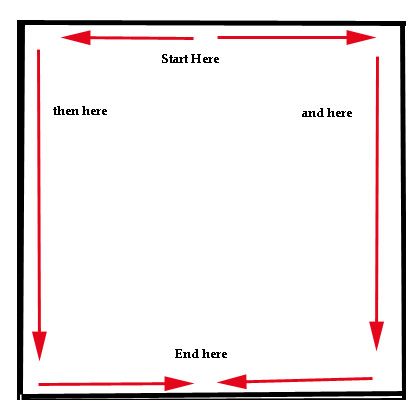
Measure off a piece of cord that is equal to the sides of the blocking frame, plus one more side to grow on (that is, just in case — better too long than not long enough). — for the Queen Susan that was 30 feet. Then mark the center point of the cord and, beginning at the center of one side, thread the cord through each point, making sure to always thread through in the same direction. When you have finished one-half of the first side, do the other half of the same side using the other end of the cord. When the whole side has been threaded onto the cord, pull the cord taut, and center the mark showing the middle of the cord in the center that edge.
Next, thread the second and third sides, ending in the middle of the fourth side of the square. Like this:
After deciding how many tension points are needed (with the Queen Susan it was every third point), with rubber bands and paper clips in hand, and starting again at the center of the first side, work around the piece, tensioning the cord and hooking it with paper clips to the rubber bands. It may take more than one pass to get the overall tension right — and the corners take some extra attention.
 After finishing the tensioning, spray the whole thing with water, throw a sheet over the top, and let it dry.
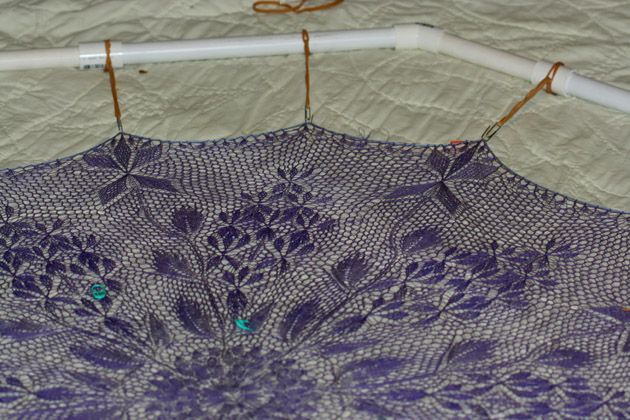
The blocking went so well with the Queen Susan shawl, I was ready to tackle Goldregen — especially after I had the face-palm of remembering that PVC elbows came in 45°, as well as 90°, angles, meaning I could make an octagon — a near circle.
Goldregen nearly matched the size of the PVC octagon — I was able to skip the rubber bands, and the elbows also divided the area evenly so it was easy to get the piece properly positioned. I did end up pinning some of the edges to get them just right — but it was much easier than trying to do it all by pinning it out.
 The final test of the system was another Niebling, Wiesenflor (Violets). The finished piece was a little bit bigger than Goldregen — so I added 6 inches to each side of the octogon.
What I really like about the PVC system is that it is so versatile: by combining different angles and sizes of PVC you can make a close approximation of any shape. The PVC is inexpensive to buy, easy to store, easy to use, and more versatile than blocking wires.
If you'd like to take a stab at hosting a WAYWO diary, you may do so by jointing WAYWO yahoo group. You may also show your interest in the comments or by using kosmail.
